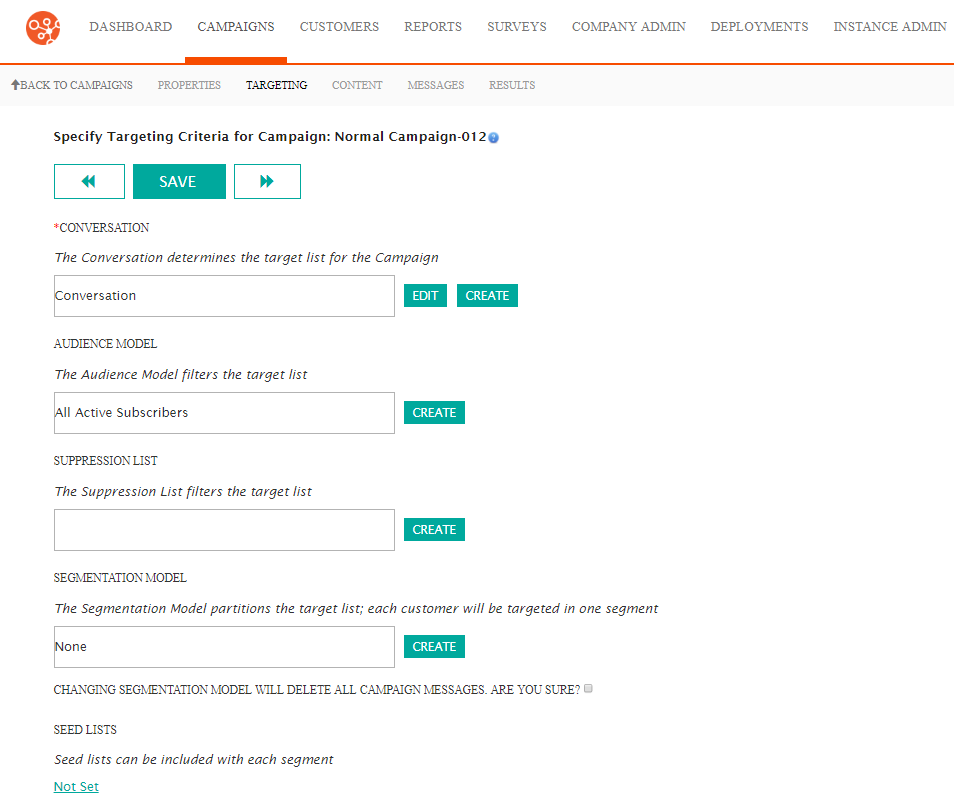
Campaign targets are managed using a combination of conversations, audiences and segmentations. Due to the dynamic nature of customer interests and permissions, all three targeting groups are associated to the campaign ensuring that they are appropriately messaged or removed from a campaign. The three campaign targeting groups (conversation, audience and segmentation) manage the change of the customer status over their life cycle of conversation engagement.
Managing Campaign Targets
- Navigate to the Targeting screen for your campaign. This can be done
one of two ways:
- For campaigns that are already created:
- Navigate to the Campaigns screen. The list of
available campaigns displays.
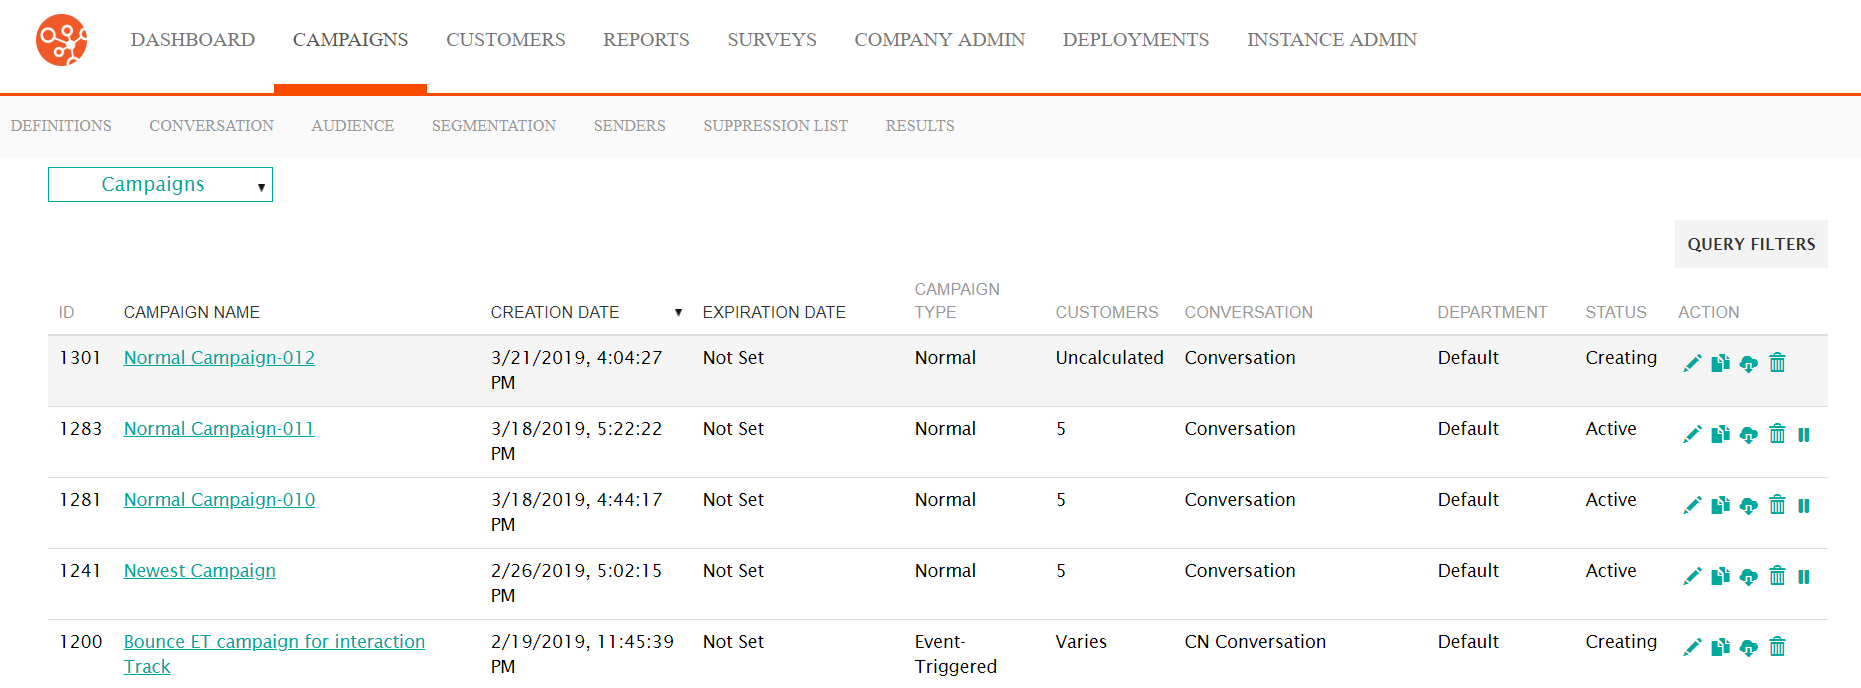
- Click on the Campaign Name link or the edit icon
(
 ) for the desired campaign. The
Campaign Properties screen displays.
) for the desired campaign. The
Campaign Properties screen displays. - Click on the Targeting sub-tab. The Targeting screen appears.
- Navigate to the Campaigns screen. The list of
available campaigns displays.
- For campaigns being newly created:
- Once you have entered the campaign properties in the
Campaign Properties screen, click the forward
button:
The Targeting screen appears.
- Once you have entered the campaign properties in the
Campaign Properties screen, click the forward
button:
- For campaigns that are already created:
- To associate a conversation to the campaign:
- Click in the Conversation field. A list of available
conversations appears.
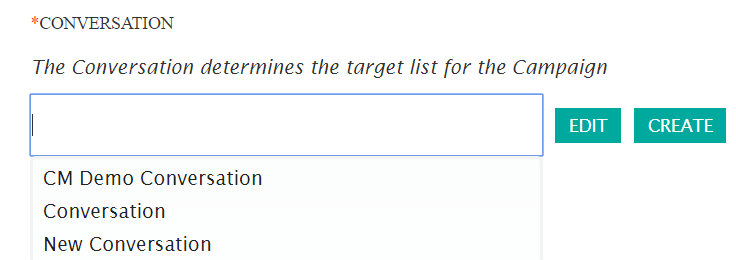
- Select the desired conversation. The conversation appears in the Conversation field.
- To create a new conversation, click the Create button. The
Add Conversation screen appears.
For more information on creating conversations, please see Creating New Conversations.
- To edit the existing conversation associated with the campaign,
click the Edit button. The Edit Conversation screen
appears.
For more information on editing conversations, please see Editing Conversations.
- Click in the Conversation field. A list of available
conversations appears.
- To associate an audience model to the campaign:
- Click in the Audience Model field. A list of available
audience models appears.

- Select the desired audience model. The audience model appears in the Audience Model field.
- To create a new audience model, click the Create button. The
Create Audience Model screen appears.
For more information on creating audience models, please see Creating Audience Models
- To edit the existing audience model associated with the campaign,
click the Edit button. The Edit Audience Model screen
appears.
For more information on editing audience models, please see Editing Audience Models.
- Click in the Audience Model field. A list of available
audience models appears.
- To associate a segmentation model to the campaign:
- Click in the Segmentation Model field. A list of available
segmentation models appears.
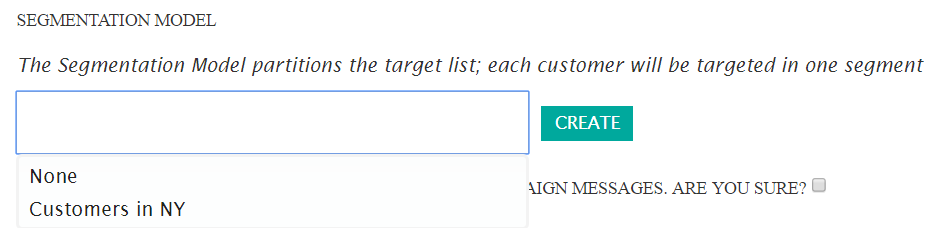
- Select the desired segmentation model. The audience model appears in the Segmentation Model field.
- To create a new segmentation model, click the Create button.
The Create Segmentation Model screen appears.
For more information on creating audience models, please see Creating Segmentation Models.
- To edit the existing segmentation model associated with the
campaign, click the Edit button. The Edit Segmentation
Model screen appears.For more information on editing audience models, please see Editing Segmentation Models.Note: Changing the segmentation model that already exists on a campaign will delete the existing campaign messages in order to associate the new segmentation model.You must confirm that you wish to change the segmentation model on the campaign. Do this by selecting the checkbox "Changing Segmentation Model Will Delete All Campaign Messages. Are You Sure?"
- Click in the Segmentation Model field. A list of available
segmentation models appears.
- To associate a seed list to the campaign:
- Click the 'Not Set' link. The Seed Lists section
appears.
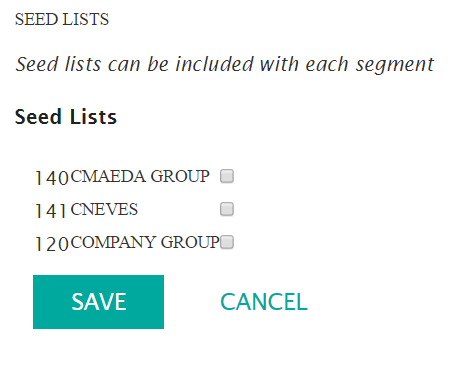
- Click the select boxes beside the desired seed lists.
- To cancel and not assign a seed list to the campaign, click the Cancel button. The Seed Lists section disappears with no seed lists associated to the campaign.
- Click the Save button. The selected seed list(s) appear in the Seed Lists section.
- Click the 'Not Set' link. The Seed Lists section
appears.
- Based on the associated conversation, audience model and segmentation model,
you are able to determine the number of customers in the conversation
(Conversation Count), the audience (Audience Count), or
both (Calculate All) in the Waterfall Counts section.
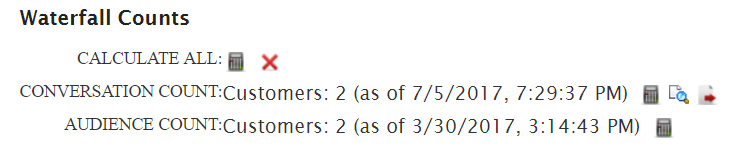 To perform waterfall count calculations use the following functions:
 : Calculate customer counts
 : Delete previously displayed
calculation. Do this to ensure that your calculations are up to
date.
: Delete previously displayed
calculation. Do this to ensure that your calculations are up to
date. : Preview the list of customers.
When previewing customers, a list of customers displays with
default data fields (e.g. Customer ID, Name, Email Address) in a
separate browser window.
: Preview the list of customers.
When previewing customers, a list of customers displays with
default data fields (e.g. Customer ID, Name, Email Address) in a
separate browser window. : Export the list of customers. To
export the list of customers:
: Export the list of customers. To
export the list of customers:- Click the 'Export Customer icon (). The Export Customers
Options section displays.
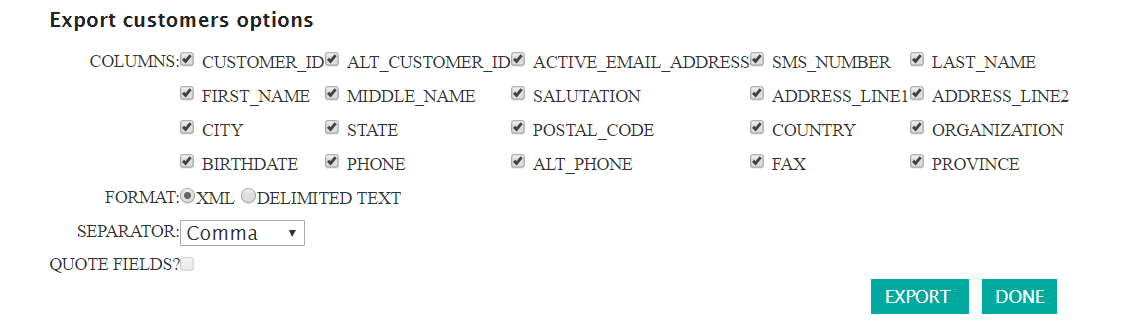
- Select the following information:
- Columns: The customer data colums you wish to export by selecting and de-selecting the appropriate fields
- Format: The desired format of the exported customer file: XML or delimeted text
- Separator: The separator for each customer field in the data file when 'Delimited Text' is selected in the Format field: comma, semicolon, space, pipe or tab
- Quote Fields: Indicates whether the data field entries will be surrounded in quotes or not in the file when 'Delimited Text' is selected in the Format field
- To return to the Targeting screen without exporting the customer list, click the Done button. The Export Customers Options section disappears and the file is not exported.
- Click the Export button. The file of customers is exported and is placed in the folder where your browser downloads files.
- Click the Done button. The Export Customers Options section disappears.
- Click the 'Export Customer icon (
- At the top of the Targeting screen, click the Save button. The targeting information is associated to the campaign.
