The Short Message Peer-to-Peer (SMPP) protocol is an open, industry standard protocol used to send and receive short message data.
Using the SMPP protocol, the Connect SMPP components initiate an application layer connection with a Short Message Service Center (SMSC) over a TCP/IP network connection to send and receive short messages.

Connect with SMPP Overview

The SMS Sender and SMS Receiver are single components that can be installed on the node outside the firewall. In the current Connect release, they are single components because of the limitation imposed by the SMSCs on the number of binds that can be made by a client.
The components maintain a cache of servers and are updated whenever the user changes the SMSC configuration in the UI. The components communicate with the CM (ConversationManager) and other internal components through the socket.
Add New SMPP Server
- From the SMPP screen, click Commands > New SMPP Server. The Edit
SMPP Server Information screen appears.
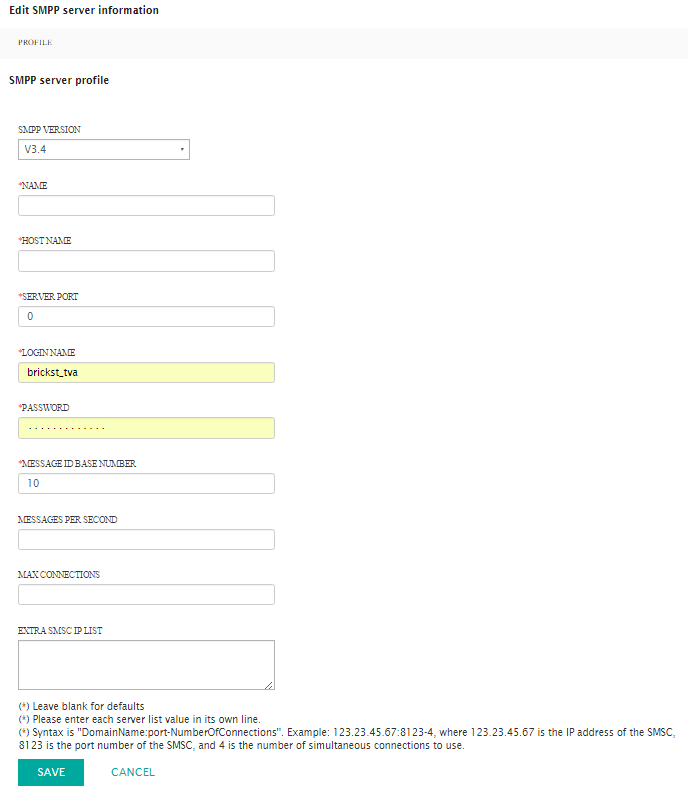
- From the SMPP Version drop-down list, select the appropriate version.
- 3.3 supports GSM only.
- 3.4 adds Tag-Length-Value (TLV), non-GSM SMS technology support, and transceiver support.
- In the Name field, type a unique name for the server.
- In the Host Name field, type the name assigned to the device.
- In the Server Port field, type the appropriate port number. The port is listed after a colon at the end of the IP address.
- In the Login Name field, type the server login.
- In the Password field, type the password for the server.
- In the Message ID Base Number field, type ???. The default is 10.
- In the Messages per second field, type the number of message to pass simultaneously if you are using sychronous messaging. If you do not know the number of messages, leave the field blank or contact your server administrator.
- In the Max Connections field, type the number for the maximum number of connections to the server.
- In the Extra SMSC IP List text box, type the IP addresses for any proxy servers. Type each address on its own line.
- Click Save. New options appear at the top of the screen.
Edit SMPP Server
- From the SMPP screen, click Actions > Edit on the row with the server you want to edit. The Edit SMPP Server Information screen appears.
- Make your edits.
- Click Save. The SMPP screen appears and your edits are saved.
Delete User Agent
- From the SMPP screen, click Actions > Delete on the row with the server you want to delete. A confirmation dialog box appears.
- In the confirmation box, click OK. The server is deleted.
