Segmentation Models are associated with campaigns and are created on the Targeting tab. Though the model can be created from a campaign Targeting tab, segmentation models can be used in different campaigns regardless of where the segment was created.
The Create Segmentation Model window has several sections where you build the model. Each set of directions in this procedure corresponds to a section in the window.
After you add all of the information you need, click the Save button to save the model.
Open Segmentation Model Window
To open the Segmentation Model window in a new campaign, from the Targeting tab, click the Create button beside the Segmentation Model field.
- From the Campaign list, click the campaign you want to edit. The Info tab appears.
- In the top left corner, click the Unlock link. The lock icon opens and the fields are unlocked for editing.
- Click the Targeting tab. The Targeting tab appears.
- Click the Edit or Create button beside the Segmentation Model field. The Segmentation Model window appears.
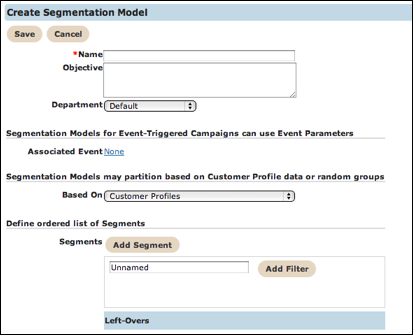
Create Segmentation Model
- In the Name field, type a unique name for the conversation.
- In the Objective field, type an informative description for the conversations.
- From the Department drop-down list, select a department. This is optional.
- Continue to the next section.
Segmentation Models for Event-Triggered Campaigns can use Event Parameters
- In the Associated Event field, click the link. The window expands to display a table of campaign events.
- In the table, click the radio button for the event you want to add.
- Click the Save button. The event appeears in the field.
- Continue to the next section.
Segmentation Models may partition based on Customer Profile data or random groups
Follow these directions to complete this section.
- From the Based On drop-down field, select the type of profile. The
section below changes to display different fields. Options include:
- Customer Profiles
- Equal sized segments randomly selected.
- Custom sized segments randomly selected.
- Continue to the next section.
Customer Profiles
When you select Customer Profiles, the Define ordered list of Segments section appears. In this section you create new segments and define filters for the segment.
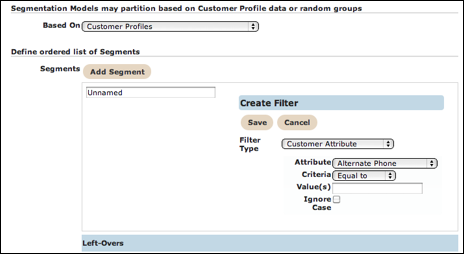
- In the Unnamed field, type a segment name.
- Click the Add Filter button. The box expands to display the filter fields. For more information about the filter fields, see the Audience Model topic.
- Click the Save button.
Equal sized segments randomly selected
A table with two rows appears when you select Equal sized segments randomly selected. You define the number of segments and name each segment.
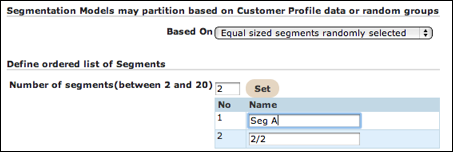
- In the Number of segments field, type the number of segments you want to create. The minimum number of segments is two and the maximum number is 20.
- Click the Set button. The table expands to display the number of rows you want.
- In the fields with numbers, type a name for each segment.
Custom sized segments randomly selected
A table with two rows appears when you select Custom sized segments randomly selected. You define the number of segments and the percentage of customers to place in the segment.
- In Unnamed field, type a segment name.
- In the % field, type the percentage of customers you want to include in the segment.
- Click the Add Segment button to insert another row in the table.