To create a Campaign report, click Campaign Reports from the menu. The Campaign report screen appears.
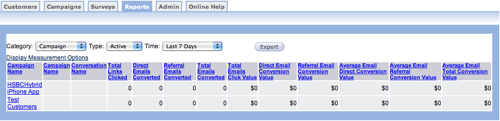
If you are assigned to All Departments, the campaign reports page displays campaigns for every department. The Department Name column lists the department assigned to specific campaigns.
If you are assigned to a particular department, only the campaigns for that department are displayed and the Department Name column is not in the table.
- Select a different report category, report type or time frame.
- Change the report measurement options by clicking Display Measurement Options,
- Click the column heading to sort the table.
- Click a campaign or converstation name to view detailed information about the selection.
- Export a report to a comma separated value (CSV) file. See the section on Export Reports for more information.
Change Report Category
When you change the category, the Type field disappears. The only category that displays the Type field is the Campaign option. Follow these directions to change the category.
- From the campaign report screen, click the arrow to display the drop-down list.
- Make your selection from the list. If you select anything beside Campaign, the
Type field disappears. Options include the following:
- Campaign
- Conversation
- Link
- Time
- Interest
- Domain
- Smpp
- If you stay on Campaign, click the Type drop-down list to select the
campaign type. Options include the following:
- All
- Active
- Expired
- Click the Time drop-down to select the date range for the reports you want to
see. Options include the following:
- Today
- Yesterday
- This Week
- Last 7 Days
- Previous Week
- This Month
- This Quarter
- Previous Quarter
- This Year
- Prevous Year
- Custom
- The table automatically changes as you make selections.
Custom Report Time
One of the options in the Time dropdown list is Custom. If you select this option, Start Date and End Date fields appear. From these fields, type a custom date range for the report.
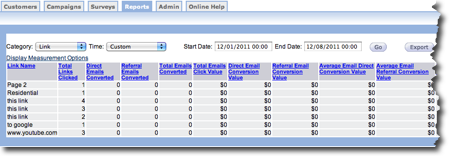
Follow these directions to create a custom date range for the report.
- From the Campaign Report screen, click the Time field to display the drop-down list.
- From the drop-down list select Custom . The Start Date and End Date fields appear.
- In the Start Date field, type the month, day and year you want to start your date range. The time part of the field is optional.
- In the End Date field, type the month, day and year you want to end your date range. The time part of the field is optional.
- Click the Go button. The table displays all of the campaigns that meet your criteria.
Export Report
- In Windows, a dialog box appears. The dialog box asks you where to save the .csv file.
- In Mac OSX, the file is downloaded to the download folder.
Change Display Measurement Options
Display Measurement Options provide you with the ability to change the columns displayed in the campaign report.
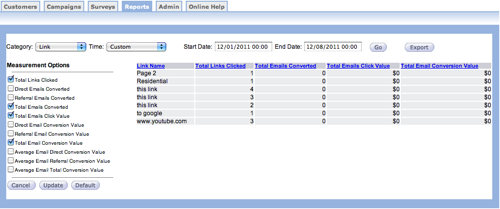
Follow these directions to change Display Measurement Options.
- From the Campaign Report screen, click the Display Measurement Options link above the table. The Measurement Options appear on the right side of the screen.
- Click the checkboxes to select the columns you want to display in the table. Click checkboxes with check marks to remove columns from the table.
- Click the Update button to change the table.
To return the table to the default columns, click the Default button.