Mail Boxes is where you add and edit email accounts. Select from these mail boxes when sending out messages or when receiving replies.

The following columns appear in the Mail Boxes table.
- Name - Unique name for the mail box.
- Hostname - Mail server name.
- Email - Email address.
- Status - Red indicates that the email address is not active; green indicates that the email address is active.
- Edit the mail box information.
Create New Mail Box
Follow these directions to create a new mailbox.
- From the Messages tab Mail Boxes screen, click the
Create button. The Enter Mail Box Info screen appears.
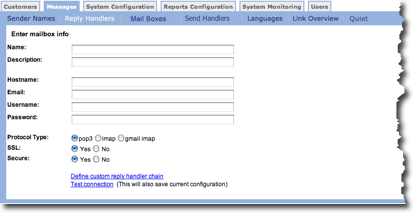
- In the Name field, type a unique name for the mail box.
- In the Description field, type a description for the mail box. Make sure the description truly describes the purpose of the mail box.
- In the Hostname field, type the email system's host name. It is the name for the mail server. For example, the Hostname for a Comcast email account is smtp.comcast.net .
- In the Email field, type the email address for the mail box.
- In User Name field, type the user name used to logon to the account.
- In the Password field, type the password used to logon to the account.
- In the Protocol Type field, select the appropriate protocol. The
options include:
- POP3
- Imap
- Gmail Imap
- In the SSL field, indicate whether you want to use Secure-Socket Link (SSL).
- In the Secure field, indicate whether you want secure email.
- Click the Define custom reply handler chain link if you want to set up reply handlers. For more information see Define Custom Reply Handler.
- Click the Test connection link to make sure the email account is active. A dialog box appears to let you know if the test passed or failed.
- Click OK to save the email box.
Define Custom Reply Handler
Follow these directions to define reply handlers.
- From the Enter Mail Box Info screen, click the Define custom reply handler chain link. The reply handler screen appears.
- From the list, click one or more reply handlers.
- Click OK to save your selections. The Enter Mail Box Info screen appears.
Edit Mail Box Information
Follow these directions to edit mail boxes.
- From the Messages tab Mail Boxes screen, click the Create button. The Enter Mail Box Info screen appears.
- Make your changes.
- Click OK to save you changes.