From the Preferences screen, you can add a new preference or edit an existing preference.

Add New Preference
Follow these directions to create a new preference:
- From the Customers tabPreferences screen, click the Create
a new Preference button. The Enter preference information
screen appears.
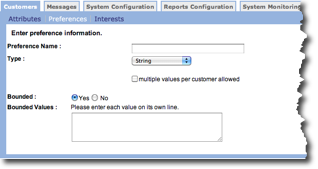
- In the Preference Name field, type a unique name for the new preference.
- From the Type drop-down list, select the preference type. Options are:
- Date - Date preference.
- Number - Takes numeric values only.
- String - Alpha-numeric content.
- Single Characters - A single character or number.
- Click the checkbox to display multiple values per customer allowed if you want to associate multiple preferences to the customer.
- In the Bounded field, select Yes to add bounded values or click No to disallow bounded values.
- Click OK to save the preference and return to the Preferences screen.
Edit Preference
Follow these directions to edit a preference.
- From the Customers tab Preferences screen, click the edit icon
 on the row with the preference you
want to edit. The Enter preference information screen appears.
on the row with the preference you
want to edit. The Enter preference information screen appears. - Make your changes.
- Click OK to save the changes and return to the Preferences screen.
Delete Preference
Follow these directions to delete a preference.
- From the Customers tab Preferences screen, click the delete
icon
 on the row with the preference
you want to delete. A confirmation dialog box appears.
on the row with the preference
you want to delete. A confirmation dialog box appears. - Click OK in the dialog box. The preference is removed from the list.