You can create secondary mail farms in Connect. The Mail Farm link is located on the System Configuration tab.

When you click the Create a New Mail Farm button or an edit icon the Mail Farm Detail screen appears.
Create New Mail Farm
Follow these directions to create a new mail farm:
- From the System Configuration tab, click the Mail Farms link. The list of mail farms appears.
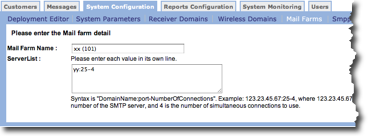
- From the mail farm list screen, click the Create a New Mail Farm. The Enter Mail Farm detail screen appears.
- In the Mail Farm Name field, type a unique name for the mail farm.
- In the ServerList field, type the server information following the
directions below the field. Each server must be listed on a separate
line.Note: Syntax is "DomainName:port-NumberOfConnections". Example: 123.23.45.67:25-4, where 123.23.45.67 is the IP address of the SMTP server, 25 is the port number of the SMTP server, and 4 is the number of simultaneous connections to use.
- Click OK to add the new mail farm.
Edit Mail Farm
Follow these directions to edit an existing mail farm:
- From the System Configuration tab, click the Mail Farms link. The list of mail farms appears.
- From the mail farm list screen, click the edit icon
 for the mail farm you want to
edit. The Enter Mail Farm detail screen appears.
for the mail farm you want to
edit. The Enter Mail Farm detail screen appears. - Make your changes.
- Click OK to save your changes.
Delete Mail Farm
Follow these directions to delete a mail farm.
- From the System Configuration tab, click the Mail Farms link. The list of mail farms appears.
- From the mail farm list screen, click the delete
 icon for the mail farm you want
to delete. A confirmation dialog box appears.
icon for the mail farm you want
to delete. A confirmation dialog box appears. - Click OK to delete the mail farm. The mail farm is removed from the list.