At a high-level, the steps to configure SMPP are:
- Configure the server.
- Specify the sender.
- Provide Advanced and TLV options if directed by SMSC.
Follow these the directions to begin.
- From the main Connect screen, select Admin > System Configuration > SMPP.
The SMPP list appears.
- Click the Create a New Server button to set up a new SMPP.
Deployment
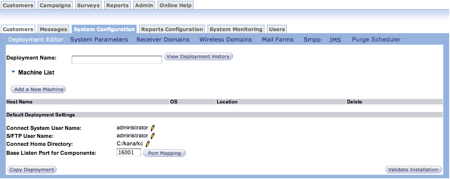
The Deployment Editor now has an SMS Sender and SMS Receiver, which are deployable to different machines. However, you can deploy only one SMS Sender and one SMS Receiver.
The deployment validation process verifies whether or not both components are added to the deployment. Administrators must deploy with both components or no components but not with only one component.
Connect can send SMS messages in native SMPP, instead of using an SMTP-to-SMPP gateway. New SMS Sender and SMS Receiver components were added to the system and the customer profile was changed to add a customer cell phone number. Connect users can decide, for each message, whether to receive SMS messages or email.
To send SMS messages, Connect users need to identify the SMSCs to route the message through. Different messages can be routed through different SMSCs as needed. Administrators define the SMSCs users can route messages through and the parameters for each SMSC.
The following directions are the steps you need to perform to create a deployment. These steps are a high level overview.
- From the main Connect screen, select Admin > System Configuration >
Deployment Editor. The Deployment Editor list screen appears.
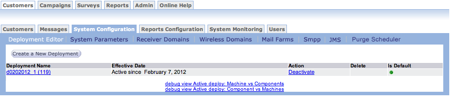
- From the Deployment Editor list screen, click the Create a New
Deployment button. The Deployment details screen appears.
- In the Deployment Name field, type a name for the current deployment. This field is required before continuing.
- Click the Add a New Machine button. The Configure Cluster Node
screen appears.
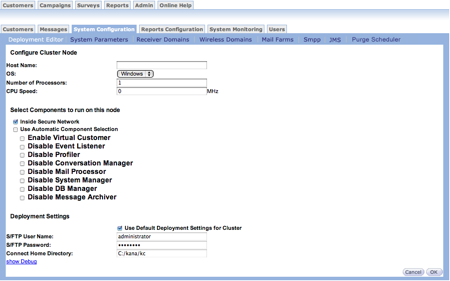
- Complete the fields and click the OK button. The Deployment Editor screen appears with the new machine added.
- Make any other changes.
- Click the Validate Installation button. Connect reviews the information and displays a dialog box with the selections.
- Click View Deployment History to save your information and come back to it later.
SMPP Sending
To take advantage of the SMPP features, you need the following:
- Customer must have an SMS number.
- Configure the SMSC (SMPP Server).
- Create a campaign and select the message mode when creating a message.
- Customers with an SMS number receive a text message if the message mode is SMS Only or SMS preferred over email.
- Choose the SMPP data coding scheme when defining the language. This is used to specify the characterset for the short text.
- Will the text message be a registered delivery?
- Launch the campaign.
SMPP Receiving
In addition to sending SMS messages, Connect can receive SMS messages via SMPP.
- Connect SMS Receiver receives delivery receipts, replies and customer initiated requests from the SMSC.
- Delivery receipts are analyzed and failures are reported.
- Other types of SMS messages are handled by the reply handlers.
- If redirection is enabled, SMS messages are reconstructed as email and forwarded to the provided list of email addresses.
The types of messages Connect can receive are:
- Replies (by existing customers) to Connect-initiated SMS messages > customer replies.
- Customer-initiated requests not tied to a prior Connect message > unexpected customer requests.
- Delivery confirmations (sent through the SMSC) > delivery confirmations.
- SMS messages from customers not existing in Connect > legitimate SMS messages from other customers.
- SMS spam messages.
The features in Connect handle, track, and report on all these cases appropriately.
SMS Messages Received - Customer Replies
Connect handles the following replies from customers:
- Unsubscribe requests
- Unexpected replies such as a forward to email response
Connect has three SMS-specific reply handlers to cover unsubscribe requests, unexpected replies and persistent bounces. These reply handlers provide the ability to forward unsubscribe requests and unexpected replies to different email addresses and archive them in two different directories. The SMS messages are forwarded in email format.
Currently, there is no way to associate a reply to the original SMS message. Connect cannot match the sender address to get the message context because the SMS response does not have the original message context (customer_id.instance_id.event_id). Until this is technically possible, all replies except delivery confirmations are handled as customer initiated requests.
In case of SMS reply handlers, the SMSUnsubscribeReplyHandler has a higher priority than the SMSContextNotFoundHanlder. If the SMS message contains the unsubscribe request unsubscribe 1111 or unsubscribe 1111 conv1 then the SMSUnsubscribeHandler handles the unsubscribe request even if the original context of the message is not found. If the handler is set to redirect then the unsubscribe SMS request is converted to an email and forwarded to a specified address.
If the message is not an unsubscribe request, it is handled by the SMSContextNotFoundHandler.
The SMS Unsubscribed count in reports is always 0 (zero) because replies cannot be linked to original messages.
Unexpected Customer Requests
Customer requests other than predefined customer replies are converted into an email and routed to an email address typically handled by Response. The outgoing email should have the following information.
System ParametersThere are SMS Sending and SMS Receiving sections in the System Parameters page which provide access to the system parameters specific to SMPP.
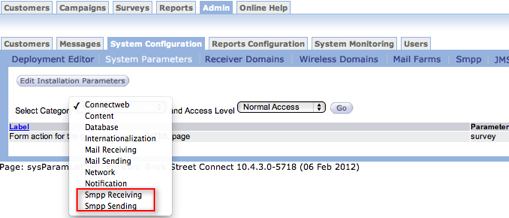
The system parameters added to Connect to support this feature are:
- SmppMaxNumberOfRetries (CATEGORY_NOTIFICATION / RARELY_MODIFIED) – Number of times the SMPP Sender tries to send the SMS message in case of a send failure.
- NoContextSmppFilter (CATEGORY_SMPP_RECEIVER / RARELY_MODIFIED ) – Filter applied by the NoContextFoundHandler when an SMS message is received by the MailProcessor.
- UnprocessedSmppArchiveDir (CATEGORY_SMPP_RECEIVER / RARELY_MODIFIED) – Directory to store the unprocessed SMS messages received by the SMPP Receiver. These are SMS messages that could not be parsed or an exception was caught when parsing the message.
- SmppResponseTimeOutSeconds (CATEGORY_SMPP_SENDER/ RARELY_MODIFIED) – Specify how long a thread waits for a response from the SMPP server (SMSC). If the time out is reached then the sender component tries to send the message again. The number of retries is determined by SmppMaxNumberOfRetries system parameter.
- SmppMaxUnackedRequestQueue (CATEGORY_SMPP_SENDER/ RARELY_MODIFIED) – Specifies the number of SMS messages sent simultaneously without waiting for responses.
- ProfilingSmppAggEnabled (CATEGORY_DATABASE/NEVER_MODIFIED) – Specifies whether Profiler calculates the aggregate for each SMPP and updates the smpp_day_agg table.
- MaxSMSUnicodeLength (CATEGORY_CONTENT/RARELY_MODIFIED) – When UCS2 (Unicode) data coding is chosen for SMPP then the maximum characters allowed by the SMSCs is 70 usually. This system parameter can be used to change the maximum number of characters the content can have when USC2 is chosen as the data coding scheme.
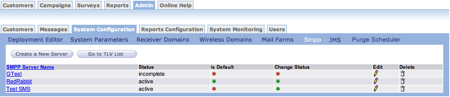
SMPP
The SMPP link contains a list of available SMPP Servers (SMSC Gateways) through which you can route SMS messages.
Actions
To set up SMPP servers:
- Select the default SMPP (selected by default in the message configuration for messages targeting customers via SMS). Connect users cannot select disabled SMSCs as the default SMSCs. (See Below)
- Add new SMPP gateways. Duplicate SMPP names or host names are not allowed.
- Delete SMPP gateways. Default SMPP gateways and gateways cannot be deleted. You can delete SMPP gateways and unused gateways.
- Enable/disable an SMPP gateway. Enabling an SMPP gateway means making it available in the message configuration (so that messages can route through it). Disabling an SMPP makes it unavailable in message configuration (as a result, users cannot route messages through it).
- By default, SMPP gateways are disabled (not accessible in the message configuration). When a gateway is disabled, users cannot route messages through it and it is not visible in the message configuration.
- SMPPs are activated by clicking the activate button.
- An SMPP can be enabled only if the administrator has completed all required fields.
- Duplicate names or hostnames are not allowed.
- Administrators can add master TLVs. These are TLVs assigned to SMPP servers.

SMPP Status Codes
Connect uses color codes to display the SMPP status. The following list defines the color codes.
- Red - Incomplete: SMPP is in the process of being created. Mandatory fields are not complete. After the mandatory fields are completed, the SMPP is automatically set to inactive. Incomplete SMPPs can be deleted.
- Yellow - Inactive: Mandatory fields are complete but the SMPP is not available to users. Inactive SMSCs can be activated, but cannot be set back to incomplete. Inactive SMPPs can be deleted if they are not assigned to one or more messages.
- Green - Active: SMPPs are available to users in the message/content setup. Active SMPPs can be set to inactive by administrators so that users cannot route messages through them. Active SMPPs can be deleted as long as they are not assigned to any messages.
You can make the following changes as needed:
Changes to an active SMPP: Change parameters and add short codes for active SMSCs (including the defaults SMPP). When an SMPP is saved, the new values appear in the SMS Sender/SMS Receiver after approximately one minute (there is no system parameter to control how long after the cache is updated by the components, the value is hard coded as 60 seconds). Note that you cannot change the name, host name, port, login name and password for an active SMPP.
Change the default SMPP: Select a new default SMPP. The Conversation Manager (CM) uses the new default SMPP when creating new messages. The new default is used only in new messages. Messages in prep or exec phase use the previous default SMPP.
Disable SMPP: Before disabling an SMPP all launched messages must be paused or expired before you can disable an SMPP. The SMS Sender disconnects from the remote SMPP and stops sending messages through it. SMS sending continues when the SMPP is enabled.
- SMPP is not assigned to a message.
- Message is paused.
- Message is expired.
SMPP Parameters
Parameters for each SMPP are grouped in three areas:
- SMPP Profile with an SMPP Sender Profile
- Advanced Options
- TLV Options
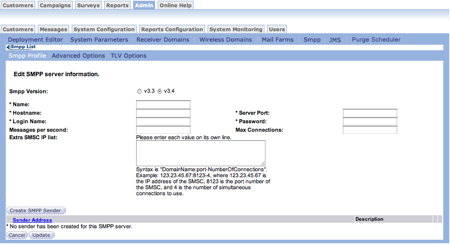
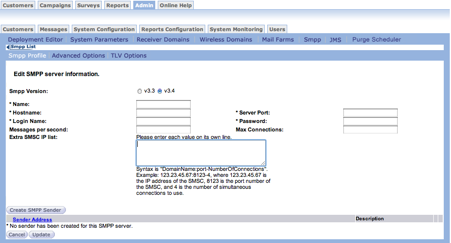
SMPP Profile
Follow these directions to define an SMPP Profile:
- From the Connect main screen, select Admin > System Configuration >
SMPP. The SMPP List screen appears.
- In the SMPP List screen, click the the Create a New Server button.
The Edit SMPP server information screen appears.
- In the SMPP Version field, select the version you want to use.
- v3.3 - The most widely supported versions.
- v3.4 - Adds transceiver support. This means that single connections can send and receive messages.
- In the Name field, type a unique name for the SMPP server. This name appears when you configure the message configuration screen if the SMPP is enabled. This field is required.
- In the Hostname field, type the remote host name accepting SMPP connections. This field is required.
- In the Server Port field, type the port. This field is required.
- In the Login Name field, type the login name for the remote SMPP server. This field is required.
- In the Password field, type the password needed to login to the remote SMPP server. This field is required.
- In the Messages Per Second field, type the number of messages per second allowed by the SMPP from each connection. If there is no limit to the number of messages sent by Connect, leave the field blank. This field is optional.
- In the Max Connection field, type the maximum number of connections the SMPP accepts from each SMS sender. This field is optional.
- In the Extra SMSC IP List field, type a list using the syntax defined below the field. This field is optional.
You can create the SMPP Sender list at this point or continue to Advanced Options.
Create SMPP Sender
Follow these directions to create a new SMPP sender:
- From the Connect main screen, select Admin > System Configuration >
SMPP. The SMPP List screen appears.
- Do one of the following:
- Click the Create a New Server button.
- Click a server in the SMPP Server Name column.
The Edit SMPP server information screen appears.
- At the bottom of the screen, click the Create SMPP Sender button. The
Enter SMS sender information screen appears.
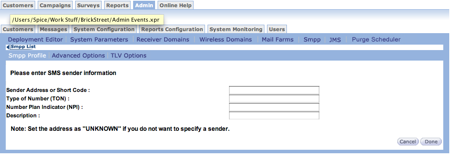
- In the Sender Address or Short Code field, type the sender number. In some countries the sender is not mandatory or the SMPP provider assigns a random sender identification. In these cases, type UNKNOWN in the Sender Address or Short Code field and leave the Type of Number field blank.
- In the Type of Number (TON) field, type the sender's address. If the SMPP provides the sender address, leave the field blank and the SMPP automatically assigns the address.
- In the Number Plan Indicator (NPI) field, type the plan indicator or leave the field blank. A blank field indicates that the SMPP assigns the NPI.
- In the Description field, type a description for the SMS sender.
- Click Done to save the information and return to the SMPP list screen.
Rules.
The following rules apply if the sender's TON and NPI are blank or set to unknown.
- If the address is in international format (starts with +) then both TON and NPI are set to one (1).
- If the address is not in international format and it is alphanumeric, TON is set to five (5) and NPI is set to zero (0).
- If the two previous rules do not apply, the SMS Sender checks to see if the address is a short code (containing all digits and the length is less than or equal to five digits. If a match is found, the TON is set to three (3) and the NPI is set to zero (0).
- If no match is found, the TON is set to zero (0) and the NPI to one (1).
Definitions
Before you create the SMPP Sender list, you need to understand some of the field definitions. The following fields appear on the screen.
- Type of Number (TON) - Identifies the number source such as international or domestic.
- Number Plan Indicator (NPI) - Identifies the numbering plan associated with the telephone number and are usually associated with SMS messages. Plan numbers identify categories such as ISDN telephones, maritime mobile, data and more. NPIs are defined by the ITU standard Q.713 in paragraph 3.4.2.3.3.
Advanced Options
The options on the Advanced Options screen are provided by the SMPP provider. Before completing any of the fields on ths screen, be sure to work with the provider to make sure you have the correct values for each field. By default, all Advanced Options fields are blank.The following procedure assumes you completed setting up an SMPP Profile in the previous procedure.
Follow these directions to add advanced options.
- From the SMPP Profile screen, click the Advanced Options link. The
Advanced Options screen appears.
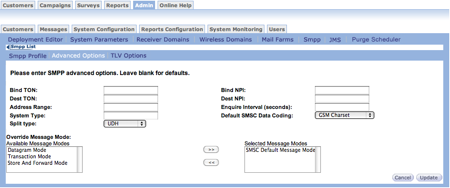
- In the Bind TON field, specify the connection type for the Type of Number. This information is provided by the SMPP provider.
- In the Bind NPI field, specify the connection type for the Number Plan Indicator. This information is provided by the SMPP provider.
- In the Dest TON field, you can:
- Leave the field blank.
- Type the default destination type for the Type of Number.
- In the Dest NPI field, you can:
- Leave the field blank.
- Type the default destination type for the Number Plan Indicator.
- In the Address Range field, type the short codes accepted by the SMPP.
Some servers look at the address range to find out which Extended Short Message
Entity (ESME) should receive the message. The address range is used when
connecting as a receiver. The address range can use regular expressions. Consult
the provider before you configure the Address Range field.
For example, when an SMSC provider assigns short codes 1234 and 1256 to an ESME, you can specify the address range as 12 when binding as a receiver. By doing this, it tells the SMSC where to forward the messages addressed to short codes starting with 12.
- In the Inquire Interval (seconds), type the number of seconds between each link request send to the server. The default is 60 seconds.
- In the System Type, type the information from the provider for this field.
- In the Default SMSC Data Coding field, select the default characterset used. The default value is GSM Charset. Ask the SMSC provider about the default character set and set the field accordingly.
- In the Override Message Mode section, do the following.
- To add an option, in the Available Message Modes list click the
option you want to add. Click add item button
 to place the selection in the
Selected Message Modes list.
to place the selection in the
Selected Message Modes list. - To remove an option, in the Selected Message Modes list click the option you want to remove. Click the remove item button to remove it from the list and place it back in the Available Message Modes.
For more information, see the Message Modes section below.
- To add an option, in the Available Message Modes list click the
option you want to add. Click add item button
- Click the Update button to save the information.
Continue to the TLV Options section or stop after this procedure.
Rules
- The TON is set to 1 if the address is in international format (starts with a +); otherwise it is set to 0.
- The NPI is always set to 1.
- Transaction Message Mode - Designed for applications that involve real-time messaging where an ESME requires a synchronous end-to-end delivery outcome without the need for long term SMSC storage.
- Datagram Message Mode - Typical SMSC functions such as scheduled delivery, registered delivery and so on do not apply. Datagram Message Mode is designed for high throughput applications that may not require the highly secure delivery functionality offered by the Store and Forward message mode. It is ideally suited for applications where the data content is transient in nature, for example, vehicle tracking applications.
- Store and Forward Mode - Stores the message in an SMSC storage area, like a message database, before forwarding the message for delivery to the recipient SME. With this model, the message remains securely stored until all delivery attempts are made by the SMSC. This mode of messaging is commonly referred to as store and forward. SMPP supports the store and forward delivery mechanism using the submit_sm operation, enabling the ESME to send a message to the SMSC where it is stored until it is successfully delivered or until the message validity period expires.
- SMSC Default Message Mode - Default message configuration for messages targeting customers via SMS.
TLV Options
The Tag-Length-Values (TLV) options are parameters used to extend the SMPP protocol with more advanced features. Connect users select the options to associate with the SMPP server. After users add the appropriate information the parameter selected and the value appear in a table above the list of available parameters. Defined parameters can be edited or deleted.
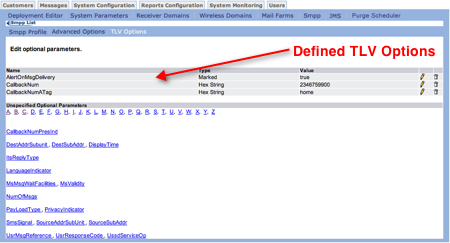
Each TLV has a predefined type (empty, string, short, integer, long, hexstring, byte, bitmask (in hex). the type also appears in the table.
The following procedure assumes you completed setting up an SMPP Profile in the previous procedure. Advanced Options are not required.
Follow these directions to add TLV options.
- From the SMPP Profile screen, click TLV Options. The Edit
Optional Parameters screen appears.
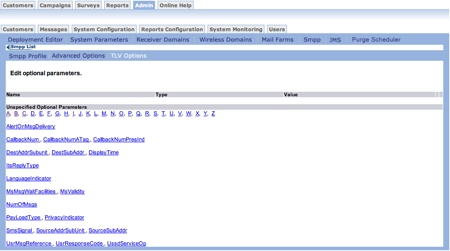
- Click a parameter. The corresponding parameter screen appears. Note that the
parameter name is on the screen.
- In the field, type the appropriate value.
- Click OK. The TLV Options screen appears with the new value above the parameter list.
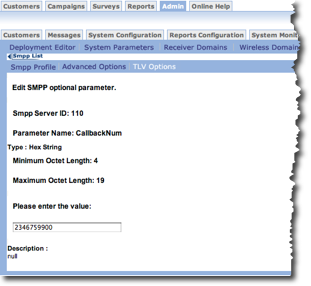
Edit a TLV Option
Follow these directions to edit an optional parameter.
- From the TLV Options screen, click the edit icon
 for the option you want to edit. The
parameter screen appears.
for the option you want to edit. The
parameter screen appears. - Change the parameter.
- Click OK. The TLV Options screen appears with the changed value.
Delete a TLV Option
Follow these directions to delete an optional parameter.
- From the TLV Options screen, click the delete icon for the option you want to remove. A confirmation dialog box appears.
- In the confirmation dialog box, click OK. The option is removed from the list.
Wireless Domains
Sending SMS messages via SMTP-to-SMPP Gateways is available with no changes.
Reports Configuration
Connect users can create Campaign Reports by Domains. All SMPPs are listed in the Domain/SMSC reports so adding SMPPs to this section is not required. Refer to the Campaign Reports section for details about how SMPP activity is reported. You can also generate reports based on a specific SMPP.