When you click the Create a New Attribute button or an edit icon for one of the attributes listed in the main Attributes window, you’ll access this window. Here you can define a new attribute or edit the values of an existing one.
Note: Attribute names are case-sensitive. Be careful not to define the same attribute twice. For example, if you define an attribute as both male and Male, Connect will consider them as two separate attributes.
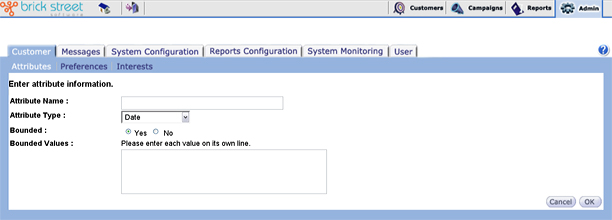
Attribute Name: Enter a short, descriptive Attribute Name. Remember that attributes are referenced frequently throughout the system and the name should be easily recognizable to the Marketing Manager using these attributes to define audiences and segmentation models.
Attribute Type: Select the Attribute Type as Date, String, Number, or Single Character. The attribute type is the expected kind of data this attribute represents.
Bounded: Click Yes or No to specify whether or not the attribute is bounded.
- Bounded: An attribute is bounded if the range of acceptable values is a specific list. For example, gender is bounded, male and female. If an attribute is bounded, specify it here and list the acceptable values. Doing this will force the user to enter only pre-defined values and will provide an easier user interface for the Marketing Manager when defining audience and segmentation models.
- Unbounded: A field is unbounded if you are free to enter any value that satisfies the objective of that field. An example would be the attribute birth date where you are free to enter any value such as December 19, 1955.
Bounded Values: If you specified Yes to Bounded, enter the valid values for this attribute. Start each value by placing it on a new line.
Note: Connect does not validate bounded field entries.
Click the Cancel button to cancel any changes you've made and return to the previous window.
Click the Ok button to return to the previous window. If you’ve made any changes, they will be saved.